| Game | Walkthrough | Gallery | Theories |
|---|
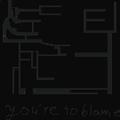
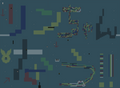
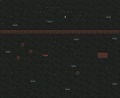
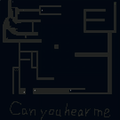
Maps

Black Maze

Hell Maze
Gargoyle Statues Area
Metal Music World
Gargoyle Statues Park
Angel Statues Area
Single-Winged Angel Statues Park
Dark Metal Music World


Effects Guide - Inahoozuki
It is highly recommended to get the Chariot and Angel effects in the first place, as they significantly ease your progress through the game and help you reach many other effects.
Spin (くるくる)
Spin around while walking.
Appearance: Inahoozuki appearance doesn`t change.
Passive Effect: Inahoozuki spins around while walking.
Action: (Shift) Inahoozuki spins around her axis.
Location: Found in Space World.
Practical Uses: None.
- Normal World
Nexus → Door #1 → Telescope Room → Space World. Go a bit left and then down, find there a spinning white NPC and interact with it.
Angel (てんし)
Lose your right arm, become an angel.
Appearance: Inahoozuki has no right arm, instead, she is given a black feathered angel wing and a black halo. Her right eye becomes red.
Passive Effect: NPCs may move away from her.
Action: None.
Location: Found in Pentagram Church.
Practical Uses: This effect allows Inahoozuki to kill NPCs and kill/banish Locks NPCs in order to proceed further.
- Normal World
Nexus → Door #4 → Single-Winged Angel Statues Park. Go north and interact with the sad-looking NPC blocking the way to a small tree, then interact with the tree → Angel Statues Island (minor teleport puzzle) → Angel Statues Sea (minor teleport puzzle). Interact with a tree on an island at the Angel Statues Sea → Pentagram Church. Go up all the way in the next 2 areas and interact with the cross.
Demon (あくま)
Lose your left arm, become a demon.
Appearance: Inahoozuki has no left arm, instead, she is given a black wing, a tail, and pointy ears or possibly horns. Her left eye becomes red.
Passive Effect: NPCs may move away from her.
Action: (Shift) Turns her red eye green and vice versa.
Location: Found in Dark Pentagram Church.
Practical Uses: Pushing Shift once will make some NPCs stop moving.
- Dark World
Nexus → Door #4 → Gargoyle Statues Park. Go north and interact with the tree → Gargoyle Statues Island (mini teleport puzzle) → Gargoyle Statues Sea (mini teleport puzzle). Interact with a tree on an island at the Gargoyle Statues Sea → Pentagram Church. Go up all the way in the next 2 areas and interact with the cross.
Chariot (チャリオット)
Become a chariot.
Appearance: Inahoozuki has the wheels of a chariot.
Passive Effect: Inahoozuki travels at double her walking speed.
Action: (Shift) Brings up a speed menu for the effect: Fast (default), Very Fast and Extremely Fast.
Location: Found in Trance Teleport Maze.
Practical Uses: Can be used to travel through the dream world much faster, chase fast-moving NPCs, and escape from chasers more easily (because it is a speed menu, the process may be increased a lot).
- Normal World
Nexus → Door #2 → Metal Music World. Go between a pair of loudspeakers. → Sheet Music World. Go all the way to the right. → Trance Teleport Maze. Reach the bottom line with the letter C. (Hint: In line with #5 - the first teleport to the right side of the number leads straight to line C.) Go through the reverted C-shaped tiles → Сannon Room. Interact with the cannon to get its wheels as the effect.
Goth-Loli (ゴスロリ)
Dress in Gothic Lolita fashion.
Appearance: Inahoozuki is dressed in Gothic Lolita fashion. Her twintails becomes curly.
Passive Effect: None.
Action: (Shift) Toggles Inahoozuki`s twintails to straight/curly.
Location: Found in Gothic World.
Practical Uses: None.
- Normal World
Nexus → Door #3 → Gothic World. Go down until the open area appears on the right, then north-east to open room with closets. Interact with the only closet without a cross on it.
Short Hair (たんぱつ)
Your hair is cut short.
Appearance: Inahoozuki wears Ginmokusei's clothes and has his hairstyle.
Passive Effect: The animation of equiping the effect is different from the usual animation for Inahoozuki.
Action: None.
Location: Found in Isolated Parking Lot.
Practical Uses: None.
- You must have obtained Angel effect to reach this one.
- Normal World
Nexus → Door #6 → Building Entryway → Dark T-shaped Corridor. Go up till you reach a wall, then go right all the way → Large Dark Room. Find and interact with a door located in the center at the top of room → Parking Lot. Kill the lock NPC with the Angel effect near the fence to proceed. (Note: Be careful - after breaking the lock NPC it causes a chaser behind you). Change to Dark World using the diamond behind the fence above. Then go down until you see water, follow the remaining parking lot tiles till you see a semi-transparent Ginmokusei, interact with him to get the effect.
Kitsune (妖狐)
Become possessed by a kitsune (demon fox).
Appearance: Inahoozuki is possessed by a kitsune. She has red eyes, fox ears, and a glowing fire-like aura.
Passive Effect: Inahoozuki travels at double her walking speed. Also she will sometimes move in a direction contrary to what the player put in.
Action: None.
Location: Found in Gargoyle Statues Park.
- Dark World
Nexus → Door #4 → Gargoyle Statues Park. Interact with the orange orb next to the entrance.
Skin Removal (スキンリムーバル)
Some of your skin is peeled off.
Appearance: The skin on Inahoozuki's face is half peeled off.
Passive Effect: None.
Action: None.
Location: Found in Black Maze.
Practical Uses: None.
- Normal World
Nexus → Door #5 → Bloody Zombies World. Go south-west and enter the grey building → Black Maze. Find the scalped Uboa-faced ghost and interact with it.
Eye (めだま)
Obtain a third eye.
Appearance: A big red and black eye appears on Inahoozuki's torso, and the Kanji 目 (eye) is written on her back.
Passive Effect: None.
Action: (Shift) Causes a flash of light.
Location: Found in Torch-Lit Dungeon.
Practical Uses: This effect allows Inahoozuki to teleport to the Nexus at will (works for Dark Worlds and Normal Worlds).
- Normal World
Nexus → Door #1 → Telescope Room → Space World. Interact with a bookshelf → RPG Maker Garden. Go down the stairs → Torch-Lit Dungeon. Interact with the stone monument. When it gives you the option to choose, select the first option (0000 01 0).
Fountain (ふんすい)
Have a fountain in your head.
Appearance: There is a fountain in Inahoozuki's head. She has blue eyes.
Passive Effect: None.
Action: (Shift) Causes it to rain and vice versa.
Location: Found in Single-Winged Angel Statues Park.
Practical Uses: None.
- Normal World
Nexus → Door #4 → Single-Winged Angel Statues Park. Go south-west and interact with the rectangular fountain below the bloody fountain.
Music Box (オルゴール)
Turn into a music box.
Appearance: Inahoozuki's head is replaced with a music box.
Passive Effect: None.
Action: (Shift) Opens the lid and playsmusic. Then (in most areas) the dream world will be toggled dark/normal.
Location: Found in the Nexus.
Practical Uses: Сan be used to switch dream worlds from normal to dark and vice versa.
- Normal World
After doing certain actions (getting at least 6 effects, one of them must be Demon, viewing the Faceless Inahoozuki Event in a Cell (Jail)), a music box will appear in the Nexus, in front of the door to Inahoozuki's dream room. Pick it up from there.
Blindfold (めかくし)
Become blindfolded.
Appearance: Inahoozuki wears a red, possibly blood-stained blindfold.
Passive Effect: Inahoozuki walks backwards.
Action: (Shift) Makes her eyes bleed, then she wipes the blood from her face.
Location: Found in the Hospital.
Practical Uses: None.
- Normal World
Nexus → Door #6 → Building Entryway → Dark Hallway. Go all the way up then turn left → Elevator → Hospital. Go to the third room from the right and interact with the potted flower on the floor.
Straitjacket (こうそくい)
Kill Kill Kill Kill Kill Kill Kill Kill Kill Kill Kill Kill Kill Kill Kill
Appearance: Inahoozuki wears a straitjacket.
Passive Effect: None.
Action: (Shift) Causes Inahoozuki to wear a bag with an eye drawn on it over her head.
Location: Found in Prison Area.
Practical Uses: None.
- You must have obtained the Angel effect to reach this one.
- Normal World
Nexus → Door #6 → Building Entryway → Dark T-shaped Corridor. Go up till you reach a wall, then go left all the way → Elevator → Hospital. Enter the leftmost room in the corridor → Prison. Kill the lock NPC with the Angel effect to proceed. Go through the door the NPC was blocking → Prison Cell. Go through the wall behind the bed, interact with the diamond-shaped jewel to switch to Dark Mirror Mode → Dark World → Spiral Room. Go down the stairway → Prison Hallway. Go through the rightmost door → Prison Cell. Hit the switch on the right to open the door → Inside the Prison Cell. Interact with the white cloth on the end table next to the bed.
OR
- Normal World
Nexus → Door #1 → Telescope Room → Space World. Go a bit up and then left. Interact with a bookshelf → RPG Maker Garden. Go down the stairs → Torch-Lit Dungeon. Go up the other stairs → Maze → Hospital. Enter the leftmost room in the corridor → Prison. Kill the lock NPC with the Angel effect to proceed. Go through the door the NPC was blocking → Prison Cell. Go through the wall behind the bed, interact with the diamond-shaped jewel to switch to Dark Mirror Mode → Dark World → Spiral Room. Go down the stairway → Prison Hallway. Go through the rightmost door → Prison Cell. Hit the switch on the right to open the door → Inside the Prison Cell. Interact with the white cloth on the end table next to the bed.
Stabbed (ぐしゃぐちゃ)
AhahaHahahaAAAAAAaaaAa❤
Appearance: Inahoozuki has a big cross stuck in her body.
Passive Effect: None.
Action: None.
Location: Found in Dark Bloody Zombies World.
Practical Uses: None.
- Dark World
Nexus → Door #5 → Bloody Zombies World. Go south-east to find a metal pipe stuck in a bloody piece of meat and interact with it.
Russian Roulette (ロシアンルーレット)
Kyahahahahahahahahahahahahahahahahahahahahahahaha
Appearance: Inahoozuki holds a gun with one bullet.
Passive Effect: None.
Action: (Shift) Causes Inahoozuki to play a game of Russian Roulette with it; aiming at her temples. Each time Shift is pressed there is a random chance (1/6 chance) Inahoozuki will shoots herself, forcing her to wake up.
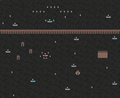
Location: Found in Bloody Zombies World.
Practical Uses: None.
- Normal World
Nexus → Door #5 → Bloody Zombies World. Interact with the gun right above to the entrance.
Guitar (ギター)
Play the guitar.
Appearance: Inahoozuki plays a left-handed red electric guitar.
Passive Effect: None.
Action: (Shift) Causes Inahoozuki to plays some chords on it.
Location: Found in Guitar Room in the Metal Music World.
Practical Uses: None.
- Normal World
Nexus → Door #2 → Metal Music World. Go straight up from entrance to a large door with a round window → Guitar Room. Interact with the guitar.
Snowball (ゆきだま)
Turn into a snowball.
Appearance: Inahoozuki has light blue eyes and turns into a snowman made of two snowballs, which silently slides on the ground.
Passive Effect: None.
Action: (Shift) Causes snow to fall and vice versa.
Location: Found in Snow World.
Practical Uses: None.
- Normal World
Nexus → Door #3 → Gothic World. Find a doorway on one of the walls between two identical dots and enter it → Snow World. Go south-east, then between two pillar-like stones. Go south-east to a big snowball and interact with it.
Micro (ミクロ)
Become smaller.
Appearance: Inahoozuki becomes very small.
Passive Effect: Inahoozuki can pass through smaller doorways.
Action: (Shift) Causes Inahoozuki to make a "Mew" sound.
Location: Found in Dark Gothic World.
Practical Uses: Can be used to pass through smaller doorways.
- Dark World
Nexus → Door #3 → Gothic World. Go up until you see a fast moving white cat. If you obtained the Demon effect, you can use it to stop the cat or just stand on the cat`s way. Interact with it to get the effect.
Argon (アルゴン)
Turn into Argon gas.
Appearance: Inahoozuki turns into argon gas, thus becoming completely invisible.
Passive Effect: None.
Action: (Shift) Causes Inahoozuki to make a sound and a speech bubble with a question mark appears a above her, showing her whereabouts.
Location: Found at the Windy Bridge.
Practical Uses: This effect allows Inahoozuki to be unseen by most chasers.
- You must have obtained the Micro and Angel effects to reach this one.
- Normal World
Nexus → Door #3 → Gothic World. Find a doorway on one of the walls between two identical dots and enter it → Snow World. Use the Micro effect to enter the cave in the wall at the upper part of Snow World → Windy Bridge. Kill the lock NPC with the Angel effect to proceed. Interact with the barrel at the end of the bridge to get the effect.
OR
- You must have obtained the Music Box effect to reach this one.
- Dark World
Nexus → Door #2 → Metal Music World. Go between a pair of loudspeakers. → Sheet Music World. Go all the way to the right. → Red Trance Teleport Maze. Reach the bottom line with the letter C. (Hint: In line with #5 - the first teleport to the right side of the number leads straight to line C.) and go through the reverted C-shaped tiles → Windy Bridge. Use the Music Box effect that allows you to switch between worlds → Normal World → Interact with the barrel at the end of the bridge to get the effect.
Windmill (ふうじん)
Gather wind power.
Appearance: Inahoozuki has a small green windmill on her head, and her eyes become golden.
Passive Effect: None.
Action: (Shift) Makes the screen to light blue for a split second, and a windmill being spun by wind can be heard.
Location: Found at the Windy Balcony.
Practical Uses: None.
- Normal World
Nexus → Door #5 → Bloody Zombies World. Go down to the crucified body, then go left and enter the opened grey door → Windy Balcony. Go right and interact with the green windmill.
Shout (シャウト)
Scream loudly.
Appearance: Inahoozuki has bright blue eyes.
Passive Effect: None.
Action: (Shift) Causes Inahoozuki to scream loudly, marking where the scream was produced with a large red crack.
Location: Found in Dark Room.
Practical Uses: Can be be used to leave up a marker (i.e., a red crack) on the map.
- Dark World
Nexus → Door #1 → Telescope Room → Space World. Interact with the small screen on the wall → Dark Room. Interact with the loudspeaker in right front of the entrance.
Duscle / Inuhoozuki / Black Nightshade (いぬほおずき)
Grow a Duscle/Black Nightshade plant on your head.
Appearance: A Black Nightshade grows out of Inahoozuki's head and she has green eyes.
Passive Effect: None.
Action: None.
Location: Found at the Dark Windy Bridge.
Practical Uses: None.
- You must have obtained the Angel and Music Box effects to reach this one.
- Dark World
Nexus → Door #2 → Metal Music World. Go between a pair of loudspeakers. → Sheet Music World. Go all the way to the right. → Red Trance Teleport Maze. Reach the bottom line with the letter C. (Hint: In line with #5 - the first teleport to the right side of the number leads straight to line C.) and go through the reverted C-shaped tiles → Windy Bridge. A shadow NPC will be blocking your way. You either must have killed it before getting here, or you can kill it by the Angel effect after switching to Normal World if you have the Music Box effect. Then you must switch back to Dark World again. → Dark World → Interact with the barrel at the end of the bridge to get the effect.
Upside-Down (さかさま) (Versions I-II) or Medicine (くすり) (Version TREY)
- Medicine (くすり)
A dangerous drug, don't take more than 2 pills a day
Appearance: Inahoozuki holds a pack of dangerous tablets, prescribed to take no more than two tablets a day.
Passive Effect: None.
Action: (Shift) Each time pressing key, Inahoozuki will take one tablet. If you make her take two tablets, she will vomit once. If you make her take three she will vomit twice, then she will pass out/die. As a result she is forced to wake up.
Location: Found in White and Black World.
Practical Uses: None.
- Upside-Down (さかさま)
Appearance: Inahoozuki walks on her head.
Passive Effect: None.
Action: (Shift) Makes Inahoozuki spin around.
Location: Found in White and Black World.
Practical Uses: None.
- Normal World
Nexus → Door #5 → Bloody Zombies World. Go down to the crucified body, then go left and enter the opened grey door → Windy Balcony. Go left all the way → White and Black World. Go up and interact with the small arrows pointing up and down.
Glasses (めがね)
Au...
Appearance: Inahoozuki wears glasses.
Passive Effect: The screen is shaking while the effect is equipped.
Action: None.
Location: Found in Dark White and Black World.
Practical Uses: None.
- You must have obtained the Music Box effect to reach this one.
- Normal World
Nexus → Door #5 → Bloody Zombies World. Go down to the crucified body, then go left and enter the opened grey door → Windy Balcony. Go left all the way → White and Black World. Use the Music Box effect to switch to Dark World. → Dark World → Go up and interact with a chest between two big arrows pointing up and down.
0-010-001-0-0000
| Spoiler warning: Plot or ending details follow. |
|---|
- Dark World
Break all the 20 locks then enter the door with the key in the Dark World 's Nexus. Examine the knife in the room.
Locks Guide - Inahoozuki
During Inahoozuki's part you will find 20 shadows of Inahoozuki with locks on them. All of them appear in both Normal and Dark Worlds, but they are only killable in the Normal World. They usually will be blocking doorways to important places. You must kill/banish them using the Angel effect in order to proceed further.
Finding and killing all of the lock shadow NPCs is sufficient for:
- Unlocking the door in the Nexus in Dark Mirror Mode (that door also tell you how many lock NPCs are left for you to kill).
- Reaching a hidden effect.
- Reaching all of the endings and clearing the game.
Here's a (partial) list of the locks by doors in the Nexus.
Door 1
- Telescope Room. Use the Music Box effect to reach the lock NPC behind the telescope.
- Telescope Room → Space World. Go a bit up and then left. Interact with a bookshelf → RPG Maker Garden. Go down the stairs → Torch-Lit Dungeon. Go up the other stairs → Maze. There are 4 locks in total in the maze: One blocking your way from RPG Maker Garden, one blocking your way from the Hospital, one blocking your way to the diamond-shaped jewel (that is the switch to one of the Normal or Dark Worlds), and another lock in a big area inside the maze.
Door 2
- Metal Music World. Go between a pair of loudspeakers. → Sheet Music World. Follow the green bridge upwards, then go all the way to the left.
- Metal Music World. Go straight up from entrance to a large door with a round window → Guitar Room.
Door 3
- Gothic World. The lock NPC will be blocking a way to a diamond.
- Gothic World (Find a doorway on one of the walls between two identical dots) → Snow World . The lock NPC will be at the bottom of the map, in front of the river.
Door 4
- Single-Winged Angel Statues Park (Interact with the sad-looking white creature blocking the way to a small tree, then interact with the tree) → Angel Statues Island (minor teleport puzzle). Go east to find a walking back and forth lock NPC.
- Single-Winged Angel Statues Park (Interact with the sad-looking white creature blocking the way to a small tree, then interact with the tree) → Angel Statues Island (minor teleport puzzle) → Angel Statues Sea (minor teleport puzzle) → Pentagram Church. Turn left after reaching the pentagram, go through the lit doorway.
Door 5
- Bloody Zombies World.
- Bloody Zombies World (Go through the open grey door) → Windy Balcony.
- Bloody Zombies World (Go through the open grey door) → Windy Balcony (Go westmost) → White and Black World. There are 2 lock NPC's walking around there.
Door 6
- Building Entryway → Dark T-shaped Corridor (Go up till you reach a wall, then go RIGHT all the way) → Large Dark Room (Find and interact with a door located in the very center of upper wall) → Parking Lot. The lock NPC is standing in a gap of the fence above the entrance.
- Building Entryway → Dark T-shaped Corridor (Go up till you reach a wall, then go LEFT all the way) → Elevator. The lock NPC will be walking in that room.
- Building Entryway → Dark T-shaped Corridor (Go up till you reach a wall, then go LEFT all the way) → Elevator → Hospital. Enter the leftmost room in the corridor, the lock NPC will be there, blocking a door.
- Building Entryway → Dark T-shaped Corridor (Go up till you reach a wall, then go LEFT all the way) → Elevator → Hospital. In the corridor, enter the third room from the left. Go through the wall behind the bed on the left. You will discover that the second and third rooms from the left of the corridor are connected. Now go to the stairway and you will enter a maze. The lock NPC will be there.
- Building Entryway → Dark T-shaped Corridor (Go up till you reach a wall, then go LEFT all the way) → Elevator → Hospital (Enter the leftmost room in the corridor) → Prison (Kill the the lock NPC with your Angel effect to proceed. Go through the door the NPC was blocking) → Prison Cell.
Events Guide - Inahoozuki
| Spoiler warning: Plot or ending details follow. |
|---|
Dark Mirror World Portals
Interact with any diamond-shaped portal to switch between the two world variations. You must get rid of one of the locks in order to get most switches.
There are 6 portals in the game in total. Their locations are the following: Hell Maze, Mental Hospital (Last patient room on the left), Black-and-White world, Church, Parking Lot, Gothic World.
Ginmokusei Effects Mirror
The Pentagram Church (which is reachable) contains an unreachable Ginmokusei that copies your movements. He is present both in normal and dark mirror modes of that area. He equips a correspondent effect to the one Inahoozuki is currently using.
- How to get to the Pentagram Church
- Normal World
Nexus → Door #4 → Single-Winged Angel Statues Park (Interact with the sad-looking white creature blocking the way to a small tree, then interact with the tree) → Angel Statues Island (minor teleport puzzle) → Angel Statues Sea (minor teleport puzzle). Interact with a tree on an island at the Angel Statues Sea, then go up all the way in the next 2 areas.
OR
- Dark World
Nexus → Door #4 → Gargoyle Statues Park → Gargoyle Statues Island (mini teleport puzzle) → Gargoyle Statues Sea (mini teleport puzzle). Interact with a tree on an island at the Gargoyle Statues Sea, then go up all the way in the next 2 areas.
Jail Event
- You must have obtained the Angel effect to be able to view this event.
- Normal World
Nexus → Door #6 → Building Entryway → Dark T-shaped Corridor (Go up till you reach a wall, then go LEFT all the way) → Elevator → Hospital (Enter the leftmost room in the corridor) → Prison (Kill the the lock NPC with your Angel effect to proceed. Go through the door the NPC was blocking) → Prison Cell (Go through the wall behind the bed, interact with the diamond-shaped jewel to switch to Dark Mirror Mode) → Dark World → Spiral Room (Go down the stairway) → Prison Hallway (Go through the rightmost door) → Prison Cell (Hit the switch on the right to open the door) → Inside the Prison Cell.
Interact with a faceless, half-transparent Inahoozuki and she will trap you in the cell instead of herself (after you let her escape by hitting the switch outside). You cannot leave the cell unless you wake up or use the Eye effect to warp you back to the nexus.
Ginmokusei Slaying (Wake-Up Event)
- You must have obtained the Angel effect to reach this one.
- Normal World
Nexus → Door #2 → Metal Music World (Go between a pair of loudspeakers) → Sheet Music World (Follow the green bridge up then go all the way left. Get rid of the NPC blocking your way.) → Heaven Room. Attempt to kill the white angel shadow using your Angel effect then go through the door that appeared after doing that.
You will reach a place that looks like the Windy Balcony. Go right and the event will be triggered. Ginmokusei with a red halo runs towards Inahoozuki and stabs her with a long sword. Inahoozuki will produce a balloon with a heart and a bizarre giggle. The screen will darken and she'll be forced to wake up.
Killer on the Loose (Ginmokusei's wake up event)
- You must have obtained Angel effect to trigger event.
Nexus - Door # 4 - Go to third staris you appears in rooms with black stick man NPCs, go to right and use Angel effect on Lock Shadow NPC, after that complete event by yourself, but in time of event go back to first stairs and find Inohoozuki's room.
Ginmokusei's Guilt
Nexus - Door #5 - On white floor find only gray tile after you step on it you appears in Minor Maze but you must just go to tree, after you teleport in Inohoozuki's Room interact with uncounciones Inoohoozuki and kick her until Ginmokusei can be stopped.
Personal Hell for two
Nexus - Door# 5 - Go and find zip-fastener and interact with it, you appears in room with familiar face on the wall, go in door anmd you appears in mini-hell with transparent Ginmokusei and Inohoozuki who look in diferent directions, depending from where real Ginmokusei go. zip-fastener, face on the wall mini-hell and tranparent Gin and Ino its reference to zip-npc, Kyukyu-kun, Madotsuki's Ghost and mini-hell location from original game Yume Nikki.,
Endings Guide - Inahoozuki
| Spoiler warning: Plot or ending details follow. |
|---|
Ending 1
Collect all 24 effects, wake up and go to the balcony. There will be a gap in the fence, interact with it/step towards it, you will hear some sounds, then there will be a full-screen text event: Thank you for playing! - Ending #1.
Ending 2
Exit your room in reality through the door while equipping the 1-010-001-1-0000 (knife) effect.
Ending 3
Destroy all 6 portals (diamond-shaped objects that allow you to switch between normal and dark modes) using your 1-010-001-1-0000 (knife) effect. When you destroy all of them, defeat the Inahoozuki that will appear in the dark world nexus then exit the door in reality room.
Ending 4
One of the conditions in order to view this ending is seeing Ending #3 in Version TREY at least once.
Effects Guide - Ginmokusei
Many of Ginmokusei's effects are acquired in groups of three from orbs scattered throughout his dream world. These particular effects cannot be obtained unless they are in Inahoozuki's possession beforehand(?). As was the case with Inahoozuki, it is recommended you get the Roomba (Chariot's equivalent) and Angel effects first, as they will make it easier to progress through this part of the game. There is also no Dark World in Ginmokusei's dreams.
Spin (回転)
wip
Angel (天使)
Nexus → Door #3 → Cylinder World. Go south east, past one cylinder. Enter the next one you see. → Connection (Interact with the tree at the end) → Forest World (Navigate the path to the exit) → Single-Winged Angel Statues Park. Interact with the ghost NPC in front of the tree. → Church Entrance "Alive" → "Alive" Church Interior. Interact with the cross.
Demon (悪魔)
Nexus → Door #1 → Forest World (Go south, east, then up into the narrow path) → Gargoyle Statues Park. Head southeast. Interact with the ghost NPC in front of the tree. → Church Entrance "Dead" → "Dead" Church Interior. Interact with the cross.
Roomba (ルンバ)
Nexus → Door #5 → Rock Music World (Go south and east to the rainbow squiggles) → Interact with the Roomba.
Goth (ゴス)
wip
Long Hair (長髪)
wip
Kitsune (ようこ)
Nexus → Door #1 → Forest World (Go south, east, then up into the narrow path) → Gargoyle Statues Park. Head north. Interact with the orange orb.
Skin Removal (スキンリムーバル)
Nexus - Door # 1 - Walk between two pinetree - Normal Hell, find Uboa like NPC and interact with it.
Eye (眼)
wip
Fountain (噴水)
wip
Music Box (ミュージックボックス)
Nexus - Door # 4 - Go down - In library interact with wingel sphere NPCs until you get effect, one of them have it.
Blind (ブラインド)
wip
Handcuffs (手錠)
wip
Cross (十字)
wip
Blank Shot (空砲)
wip
Bass (ベース)
wip
Snowball (雪玉)
wip
Micro (ミクロ)
wip
Krypton (クリプトン)
wip
Windmill (風車)
wip
Shout (シャウト)
wip
Fragrant Osmanthus / Fragrant Olive / Ginmokusei (ぎんもくせい)
Nexus - Door # 4 - after you go on upstairs go to second door, go on upstairs - World of Sinks (?) find red pentagram - Invisible Maze - Childish Doodle World find two long pencils with bloodstains and go between them - Dark Hell (actually red) go and find white square - April Fools Location - Interact with second cross.
Invert (インバート)
wip
Glasses (眼鏡)
wip